
In the realm of robotics, the ability to manipulate objects with precision is essential. The example presented here demonstrates a Python script designed to control a robotic arm equipped with four servo motors. The arm operates with four degrees of freedom, allowing for a versatile range of motion.
By learning to programmatically control a robotic arm using Python and our Robo-Tx robotics library, students can build on key STEM skills, such as:
- Algorithm Design: creating algorithms that control the robotic arm’s movement and actions.
- Mechanical Design: gaining insights into the arm’s mechanical aspects and how different components work together.
- Actuators: understanding how to interface with and control servo motors for the arm to interact with its environment.
- Troubleshooting: developing skills to diagnose and fix issues that arise during programming and operation of the arm.
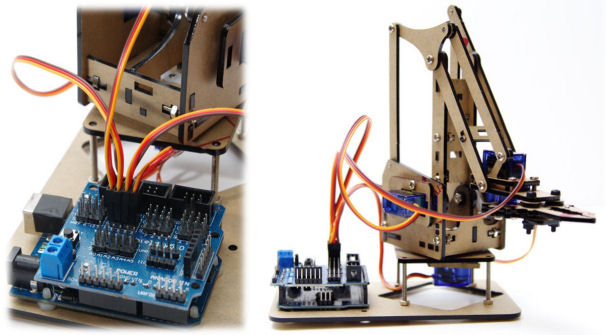
To find out more about the Robo-Tx framework, visit Python Robotics Simplified. Robotic arms as pictured at the top are low cost and easily available as kits to assemble from online stores. These kits usually consist of four servo motors, arm and joint parts, and various fixings. You will need an Arduino Uno with the Robo-Tx firmware uploaded to it, a sensor board, and a suitable 5V 3A power supply connected to the terminals of the sensor board.
Download the Project Source Code and Required Utilities
Visit and review Software, Equipment and Tools for Building Robots for instructions to configure your robotics development environment. Use the links in that section to download all robotics project source code and necessary libraries. Before uploading the Robo-Tx firmware to your Arduino Uno, confirm that SELECTED_PROFILE is set to PROFILE_ROBOT_ARM_4DF in the file Settings.h. Review this profile to discover how other actuators are supported in this configuration.
Connect the robotic arm servos to Arduino pins 8, 9, 10 &11 via the sensor board mounted on the Arduino. Make sure the servos correspond correctly to the arm joints (pan, shoulder, etc) in the Python source code file robot_arm_4dof.py. Running the Python source code results in the robotic arm performing the task of picking up an object and placing it to the side. Refer to the troubleshooting guide if you encounter any problems.
Enhance the Project with Your Own Ideas
The project’s Python source code has scope for improvement, such as performing tasks based on the reading of sensors, e.g. infra-red proximity sensors or temperature sensor. In the project’s current configuration up to three digital sensors (Arduino pins A0 to A2) and three analog sensors (Arduino pins A3 to A5) are supported. Other actuators are also supported, such as DC motors, LEDs and an active beeper (trigger). The code snippet below serves as usage examples for some of the features of the Robo-Tx library.
led1 = robotArm.Switch1
led1.On()

temperature = robotArm.Analog.A4.Value
buttonState = robotArm.Digital.IN0.Value

motorL = robotArm.Motor1
motorL.DriveForDuration(20, .75)
Review the other Python robotics projects and refer to the Robo-Tx library help to learn more about reading sensors and controlling actuators. Use the comment section to share ideas or if you have any difficulty.