
Start Your Robotics Journey with Python, Arduino and Robo-Tx
Many students want to know how to get started with robotics, such as which programming languages to learn, what resources to use, and what basic knowledge they need. Python is a fantastic language for learning robotics. Students can focus more on learning robotics concepts rather than getting bogged down by complex programming syntax. Python is also platform independent which means Python projects can be deployed on numerous computing environments.
Arduino boards are a simple type of microcontroller which are relatively inexpensive, making it a budget-friendly option for learning. Boards such as the Uno are user-friendly, and there are countless tutorials, guides, and examples available online. The term Arduino by itself is often used to refer to an Arduino board.
Robo-Tx is a new robotics framework that bridges the world of Python with the world of Arduino. It consists of a configurable firmware that is deployed to an Arduino, and a library that is accessed from Python robotics projects running on computer connected to the Arduino. The Robo-Tx library simplifies the reading of sensors and the controlling of actuators connected to an Arduino, and supports the following:
- Up to 2 DC motors
- Up to 4 servo motors
- Up to 8 analog sensors
- Up to 5 digital inputs (buttons, line and obstacle sensors)
- IR remote sensor
- I2C Colour sensor
- Sonar module
- Up to 4 digital switch outputs (for LEDs, relays and solenoids)
- LED 4 digit display
- I2C LCD 16×02 display
- Active beeper/buzzer
- Digital pulse counting on pin A2
Know the Key Components of a Robot
The fundamental parts of a robot are microcontrollers, sensors, actuators, and a suitable power supply. Microcontrollers are small scale computers on a single chip that are designed to run software that performs specific tasks in electronic devices. For instance, reading sensors or controlling motors.
A sensor is a device that detects and measures physical properties (like temperature, light, sound, or pressure) and converts them into signals that can be read and processed by the robot’s software.
Actuators are components in a robot that perform physical tasks like moving robot arms, turning wheels, opening and closing grippers, or adjusting sensors. They are critical in enabling robots to interact with their environment. Motors, relays and LEDs are examples of actuators.
Most importantly, different components in a robot may require different voltage levels. A suitable power supply provides the correct voltage and current to each component, ensuring optimal performance. For mobile robots, a lightweight and compact power source is essential to maintain mobility without adding excessive weight.
Software, Equipment and Tools for Building Robots
Software Applications and Libraries
Prepare your computing environment for Python robotics learning by installing the freely available software listed below.
- Python – install for all users and select option to install PIP.
- Arduino IDE – for uploading the Robo-Tx firmware to an Arduino.
- .NET framework – required by the Robo-Tx library.
- Pythonnet – required for using the Robo-Tx library from within Python programs.
- VSCode – (optional, but recommended) for developing Python programs. Use with Python extension.
- Robo-Tx firmware – must upload to your Arduino. Review comments in project file first.
- Python projects – source code of Python projects that use the Robo-Tx framework.
- Robo-Tx API source code – (optional) Visual Studio .Net solution.
Arduino Boards and Components
As well as having an Arduino board to hand, such and an Uno, two other Arduino related components are incredibly useful to have. They are a motor controller add on board and a sensor board, shown in the images below. Boards such as these are also known as ‘shields’ and they are inserted in to the pin sockets of the Arduino.

The motor controller board drives up to two DC motors, one servo motor, a sonar module, and has a socket for a Bluetooth module such as HC-05. It also has connection pins that support a variety of analog and digital sensors. Power for the DC motors is supplied either thru the Arduino barrel connector, or the optional screw terminals.
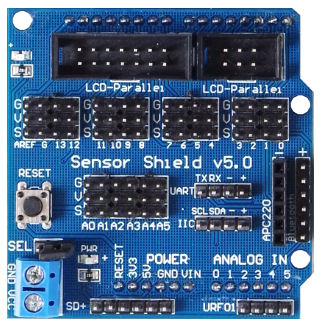
Alternatively, the sensor board is a generic add on board that supports the use of a separate 5v power source. This is useful for certain devices that will interact with Arduino digital pins 0 to 13. For instance, a project such as a robotic arm will benefit from the use of this board as it is able to support multiple servo motors. Use this sensor board, with either a motor controller breakout board or an Arduino with an integrated motor controller, for robotics projects that require a combination of different types of actuators and sensors.
Miscellaneous Equipment
Lastly, other useful equipment items to have are: digital multi-meter, soldering iron, M2.5 nylon hex spacer kit, cordless drill and 3mm drill bit, and an assortment of hand tools.
Python Robotics Projects to Get You Started
To use your Arduino board with the Robo-Tx library in a Python project, the Robo-Tx firmware must first be deployed to the Arduino using the Arduino IDE. The firmware supports configurations for different use cases by way of profiles defined in the firmware project’s Settings.h file. Having basic knowledge of Arduino boards, sensors and actuators will be helpful in selecting or defining a suitable firmware profile to upload to your Arduino.
There are several Python robotics projects using the Robo-Tx framework to begin your robotics learning journey. Some robots are based on ready to build kits, and others require Lego Technic parts which are easily available from online stores such as Brick Owl. Use the links below to navigate to the pages of each project.
- 4 degrees of freedom robotic arm
- Solar tracking robot
- Obstacle avoidance vehicle
- Line following vehicle
- Automatic two speed LEGO Technic gearbox
If you are looking to start with something simpler, try the projects at Arduino Multi-function Board and Beyond Using Python.
Using a Bluetooth Module for Python Robotics Projects
Some of the projects will work best with a Bluetooth module, such as HC-05, which will need to be configured to 115200 baud. The procedure for doing so will depend on the type of the Bluetooth module, and as such the correct documentation will need to be consulted. In any case, it is recommended to use an Arduino board that has a secondary hardware serial port to connect the module to. For example, an Uno R4, Leonardo or Mega 2560. An overview of the procedure is summarized below.
- Upload Arduino Code: Upload to the Arduino this Bluetooth config code for communicating with the Bluetooth module, then disconnect power to the Arduino.
- Connect Module to Arduino: Connect the Bluetooth module to available serial pins of Arduino board.
- Enter AT Mode: Perform the necessary step to enter in to AT mode. On HC-05 there is usually a button to press whilst powering up.
- Use Serial Monitor: Open the Serial Monitor in the Arduino IDE using baud rate 9600.
- Change Module Baud Rate: In the serial monitor, enter the correct AT command to change the module’s baud rate. For an HC-05, it is usually AT+UART=115200,1,0 followed by Enter.
- Exit AT Mode: Reset the Bluetooth module.
- Pair Module with Computer: Confirm the Bluetooth is powered up and pair with your development computer. On Windows computers you may first need to enable (advanced) discovery in the Bluetooth settings.
- Identify Bluetooth Serial Port: Use the operating system to identify the name of the Bluetooth serial port, which must then be referenced in the Python project file.
Troubleshooting, Testing and Debugging Your Robots
Troubleshooting robotics projects can be challenging and sometimes frustrating. However, with a systematic approach you can identify and fix most issues. In the list below are some common steps to help you troubleshoot your projects:
- Computing environment – confirm the required development software and libraries are installed and up to date.
- Documentation check – review notes in source code and readme files.
- Firmware configuration – ensure the Robo-Tx firmware uploaded to your Arduino has a suitable profile selected in the Settings.h file. Only those components supported by the selected profile can be connected to the designated pins of the Arduino.
- Check connections – ensure all wiring and connections are secure and correct. Connection contacts should be clean and shiny.
- Power supply – verify that your power supply is providing the correct voltage and current to the components.
- Faulty components – inspect for signs of damage and test sensors and actuators using either a multi-meter or a spare Arduino and simple test code. Check for dry solder joints and rectify using a soldering iron.
- Console output – in the Python projects use print() statements to write meaningful debug output to the console.
- Utilize a Python debugger – step through your code, set breakpoints, and inspect variables. IDEs like PyCharm and VS Code have built-in debuggers with user-friendly interfaces.
- Simplify the problem – extract sections of your Python code in to its own project and test in isolation.
- Robo-Tx library help – consult the online help to check library function usage.
- Code reviews – have a colleague or friend review your code. A fresh pair of eyes can often spot issues you’ve overlooked.
Tell Us About Your Projects
The Python robotics projects listed on this page have the scope to be improved and extended, and they may inspire you to try out your own ideas and build robots for different use cases. Let us know how you get on by leaving a comment below. Happy roboteering!